Showing posts with label cotton. Show all posts

Saturday, September 20, 2014

Have Beer, Will Travel: Bike Six-Pack Holder Tutorial

Hello, hello, hello!  I know it’s been a little while…but I’m back with the long-ago-promised tutorial for a bike-safe six-pack holder (I know you’ve been waiting with bated breath, and quite frankly I can’t imagine how you’ve gotten along thus far without it!  My most sincere apologies from keeping you from this vital information.)  But hey! Enough chat.  Let’s get to it!


This 6-pack carrier has strips of Velcro on the inside, so that in addition to being a regular carrier, it opens flat so that it can be draped over a bicycle bar for easy transport. 

Saturday, May 10, 2014

Hello, remember me?

Hey remember the time that I posted a bunch of new years resolutions (including one to post often and regularly) and then disappeared for three months? Me neither. Actually, the past few months have been a blur of finishing up my Master’s degree once and for all, making plans for the future, and hanging out with these guys.


 But the important thing is that I’m here now, and I’m chock-full of ideas that I can’t wait to put into action! First things first, though: I’ve got to get caught up on the past few months, starting with the Valentine’s Day gift I made for Sean this year. Since Valentine’s Day is right around the time that his all-time favorite beer comes out and he quite likes to ride his bike all over his sunny little town, I decided that the thing he needed for Valentine’s Day was a six-pack holder that he could strap right to his bike, and then take off and carry around if his little heart desired to do so. I did some poking around online and just couldn’t find what I was looking for, so I decided to make one of my own! I made it out of canvas and printed cotton, using some elastic to keep the bottles in their little cubbies, and velcro to fasten the undersides together.


 I’m working on a tutorial for this little beauty, so stay tuned! And oh, have I missed you. Glad to be back.

Monday, February 10, 2014

Better late than never

Today is just one of those days that no matter how much I try to organize things and make things go my way, the universe (more specifically, the weather forecast) seems to have other plans.  I have given up hope that my poor, snow-sodden street will ever be plowed, and the impending sub-zero temperatures are certainly a blow to my morale.  But never fear!  I'm going to stop complaining now.

When going over all of my past posted projects this weekend (have you checked out the new and improved tutorials and things i've made tabs??) I realized that this poor, poor bag I made last fall missed out on its blog debut.  So, to remedy the situation, here is a very belated post of a little book tote I put together last fall sometime.  I'm always in need of bags that are big enough to hold lots of music, and this amazing Anna Maria Horner print that I'd previously ordered was screaming to be put to use somehow.  I found the rest of the supplies I needed from my overflowing bookshelf of sewing disorder, and threw this together in just a day.  


I did some experimenting with details on this bag, so there is a lot going on, which suits me just fine.  I had originally intended to give the top edge scallops, but I cut them too small, and they looked like messy spikes once I assembled the bag.  So I took those off, and added some grey pleats to my now-flat-and-plain-top edge.  I added some peach lace to the sides (I just felt like the blue/grey pallete needed some kind of contrast.)  For the straps, I used some thick cord, covered with plain grey cotton, fastened with gold square rings.  I added a small inner zip pocket, and lined it the same grey cotton that I used for the sides and straps.

I still have every intention of making a scalloped-edge bag, so I plan to mount a second attempt soon.  I'm also beginning to dread the thought of moving my overflowing fabric collection when I finish my degree in May, so I've imposed a ban on buying, and have a good deal of sewing to do between now and then.  Any great project ideas you'd like to share?

Tuesday, January 28, 2014

Fabric Storage Bins Tutorial

Today, the temperature in Cleveland is somewhere in the -20's, and everything is covered in the grey slush of poorly plowed snow (which I'm sure is thoroughly frozen by now.)  So, I whipped up a little fabric bins tutorial for your sewing pleasure.  Please let me know if you have questions or run into any problems while making this project, and enjoy!


Click on the link below, and find the full tutorial after the jump.

Monday, January 20, 2014

Bins and Baking

Today was grey and snowy outside, so it was filled with baking and sewing inside.  Since it's only January and I'm still trying to stay true to my resolutions (just give it a few more weeks!) I finally finished a project that had been collecting dust on my ironing board (...and then on my bookshelf...and then on the floor of my closet...) since September.  I've been meaning to amp up my bathroom storage for a while (read: come up with some kind of storage system at all) and these little fabric bins were just the ticket.  They were pretty simple to put together, and certainly helped tidy up my bathroom shelves a bit.  I'm working on a start-to-finish tutorial, which will be posted soon, but here are my lovely new bins, in all of their organizational glory...


The rest of the day was spent baking bread and my favorite lavender cookies.  Not bad for a Monday, I say!

*The tutorial is now up!  Click here to see it and make a bin of your very own!

Thursday, August 1, 2013

Snappy Dyed Wallets


I might be crazy for doing this, but I just signed up for my second half-marathon!  This one is in just a few weeks, but my sister and I picked it out a few months ago and have been training diligently (ahem, almost diligently) so I'm suuuure it will go splendidly.  We chose one in Annapolis, Maryland, and we're going to make a weekend of it and spend a few days with my parents (and of course, their two pugs, Lucy and Ricky) on their sailboat.  I can't wait to parade those little dogs around town, eat ice cream and seafood, and do some exploring in Annapolis.  Here's to hoping I survive the race, as well!

Before I embark on that adventure, however, I have a few more projects up my sleeve: including the second installment  of the dip-dyed adventures (earlier adventures can be seen here!)  For this project, I used a couple of dip-dyed striped pieces.  I have been steadily working my way through them, in an effort to use these pre-cut pieces up before I forget what project I cut them out for (not like that's ever happened before or anything.)  To create the stripes, I folded my fabric pieces, clipped them with clothespins, and then dipped them into the dye, leaving some un-dyed at the top.  Once they were somewhat dry, I unclipped them and set them with a fixative to avoid bleeding.  What a triumph it was to pull my little pieces out of their buckets and to see that they actually had stripes on them!  Once all of the dyeing was completed for the outer pieces, I cut the insides bits and pieces from this great light blue/silver metallic lining that I found last week at Joann's, and already used for some zippered pouches.  I layered the inside pockets to make room for credit cards (or in my case, a vast array of coffee shop loyalty cards) and a few larger pockets for cash, receipts, lists, pet photos, etc.  I put a zippered coin/trinket pocket on the outside, and voila…a wallet!  I hand-sewed a snap button to the inside (post-photo shoot-I'll upload a complete photo as soon as I snap one!) to keep everything tidy and closed up, and declared these beauties ready for their internet debut.  


One of my many sewing "helpers" taking advantage of some good morning light
My mom and I have also been spending some time on a super-secret project that I will be able to share in just a few weeks (if you can manage to contain your excitement that long, that is.)  I'll be posting a sneak peek this weekend, and the will be revealing the finished project soon, so stay tuned!  Hope your weeks are going wonderfully, thanks for stopping by!
  

Monday, July 29, 2013

Zippered pouch tutorial!


As promised, I worked up a little tutorial, filling y'all in on how I make my little zippered pouches (I knew you were just dying to know!)  Check out the full tutorial after the jump!  As always, I would love to see any projects you come up with, so I hope to hear from you soon!


Sunday, July 28, 2013

Adventures in Dip-Dyeing


Hello, there!  I've spent the last few days trying my hand at some dip-dyeing, and I'm so excited to share what I came up with!  This recent dyeing experiment came out of a valiant, if vastly unsuccessful attempt to right a pair of my sister's pants that had been quite wronged by some hand sanitizer.  By that, of course, I mean that she tried to remove some tree sap from her pants with hand sanitizer.  While it took out the sap brilliantly, it also seeped through to the front of the pants and caused some massive bleach stains (oopsies!)  Of course, my first response was "don't even worry about it, we can dye them" only to realize that bleach stains don't really want to be any color than white (or really, some gross yellowish variation of actual white.)  After employing many creative (read: ridiculous and very messy, even for an outside project) dyeing techniques, I threw in the towel (or pants: I literally threw the whole pair of pants in my dyeing bucket in an effort to unify the color, to no avail) and moved on to Plan B, which was dying some lace to match the pants, cutting the stains out of the pants, and adding the lace behind the holes.  We'll just have to see what happens with hair-brained scheme #2.

However, the real up-side to this dyeing disaster was that the pants in question are a great coral color, which I matched by mixing two boxes of Rit dye: magenta and orange.  It seemed such a shame to make a whole batch of dye for just a little bitty stain, so I planned a few projects, picked up come unbleached cotton, and had a blast experimenting with dip-dyeing.  For the most part, I just dipped parts of the pieces into the dye, leaving the other portions white.  For a few pieces (once I had some confidence in my dipping skills, really) I folded the fabric to make stripes, which I'm pretty proud to say actually look like stripes.  I've been making my way through the dyed pieces, cutting lining pieces to match and sewing them into little pouches, wallets, and bags, and I have just a few to share with you today.  

These four pouches were the simplest of my planned dip-dyed projects, so I started with them.  I interfaced all of the dyed pieces, cut linings from some great metallic prints I found at JoAnn Fabrics, and just added a 9-inch zipper to each to make some simple pouches.  I have been meaning to try a half-circle pouch for a while, and I love how they came out!  The only thing missing from these little pouches is a great zipper pull.  I'm thinking…tassels?  Maybe a little pull made out of lace?  So many possibilities!


In other news, I'm working up a simple photo tutorial on how to make your very own zippered pouches.  They've really become one of my go-to projects…they're simple, quite quick to whip up, and leave lots of room for customization (the world is your oyster with this kind of simple project template.)  I hope to have that up tomorrow, so stay tuned!

I spent the rest of the weekend doing lots of running, practicing, spending time with my sister, and of course, with this guy.


  I hope your weekends were as lovely and relaxing as mine was.  

Monday, May 27, 2013

I'm baaack!

Hello, world!  I know I've been gone for some time, but the truth is...things just got a little too busy, and a little too crazy, and I took a little hiatus.  Okay, it was an I-dropped-off-the-face-of-the-earth-for-a-few-months-hiatus, but I'm back now and I'm full of ideas!  I spent this lovely Memorial Day in Pennsylvania making some great big plans for the coming weeks, checking out the new fabric store in town, and hanging with the family (and quite a few pugs, of course!)  Here is my day in a nutshell:


I jumped in head first with some new projects this afternoon (which, of course, means that I spent the afternoon washing, drying, and pressing the fabric I picked up today) and I just can't wait to get behind my machine tomorrow.  I hope your Memorial Day weekend was as relaxing and family-filled as mine was.  And it's great to be back, I've missed you!

Monday, January 7, 2013

Moving ahead

As intended, I sewed my recent embroidery project into a little clutch.  I used some navy corduroy for the back, and some pretty white cotton for the lining.  So now all that's left are some final decisions: pom-pom zipper pull? Strap?  For now, my little clutch is just that, and I love it.


My plan for now is to avoid these last earth-shattering clutch-related decisions and forge ahead with more projects!  There's nothing like the creative boost that comes with New Year's resolutions and a little (but actually quite long) break from school. 

The rest of my day was spent getting a little work done, sipping coffee, and making pattern pieces for my next project, (drumroll, please...) a dress from the BurdaStyle Sewing Handbook.  I got this book for my birthday last August and have since been lusting after the projects within and plucking up the courage to try one.  Since the book is designed to be used with handmade patterns, I have been gradually working up the courage to tackle this seemingly insurmountable task.  I can't say why pattern-making frightened me so, but I came up with one excuse after another to avoid it.  So in light of the recent New-Year momentum, I jumped right in last night, and began drafting the pattern pieces for my dress.  (I had a little help...see below.)  Today I finished them up, cut them out, and went ahead and cut out my fabric pieces.  I'm ready to start sewing tomorrow!  This project will also mark my first invisible zipper, and my first fully-lined dress.  Can't wait to get started!


Happy Monday!

Monday, December 10, 2012

Table fancy

Dearest blog world: I promise I haven't forgotten about you. I know you've heard it all before, but I've just been so busy at school. Not only have I been doing lots of musical things, but I'm officially working my post at the library, as well. That's right, folks, I'm a real, honest-to-goodness reference librarian, complete with thick-framed glasses and a wheeled chair in which to pretend I'm doing actual work.  Life is good!

On the home front, I've been dealing with some minor behavioral "incidents" with Oliver. These have mostly involved raucous trash parties, and some presents of the #2 variety in the living room. I usually call them "incidents" or "on-purposes," because I just know they're not "accidents." But who can stay mad at that face?


I also finally got around to re-upholstering the folding table and chairs in our living room.  This card table and chairs was a wedding present to my parents thirty-something years ago.  I took it with me to Boston when I lived there a few years ago, and my mom helped me re-upholster it then.  While I still love the funky prints we found, they were looking a little worse for wear:

 
I took all of the seats and seat-backs out of the chair frames, and spray painted them gold. This part of the process did not go quite as I had planned, largely because of the plummeting temperatures and blustering winds on my back balcony in Cleveland. I wound up almost completely covered in gold spray paint (as did the back balcony) while the chairs are spotty, at best.  As luck would have it, the set was a golden-beige color to begin with, so I'm hoping I can get away with a shoddy paint job.  Fingers crossed! 

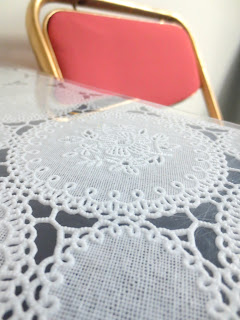
For the upholstery, I used navy blue cotton ($2/yard at Wal-mart) and a sheer pink polyester blend ($1.50/yard at Wal-mart.)  I covered all of the chair pads, as well as the table top, in the navy blue cotton.  For the chairs, I covered the navy with the pink, and I left the table navy.  Cutting out the fabric was simple enough (and I used the previous upholstery pieces as general patterns) but getting the new pieces attached with the staple gun was a battle.  Thank goodness for reliable (and strong-armed) help...I just knew Sean wanted to help me with a project when he visited!  I love the combination of the dark navy, this peachy pink, and the gold frames.  It was just what I had in mind!  Overall, this project was pretty simple: just dissemble the table and chairs, cut out the pieces of fabric to cover the pads, staple them on, and re-assemble!   My favorite part of the new setup is this lacy vinyl overlay that my mom found for me at a local craft store in Pennsylvania.  My original intention was to cut it so that it fit on the table top, but I have yet to do so.  I sort of like the way it looks as a table cloth, so I may try this out for a bit before I snip off the ends.  It sits just under the glass top, and the white lace patterns contrast with the navy table top perfectly.  Since it's vinyl, it wipes clean easily when I (inevitably, and quite often) spill food and/or coffee on it.




Happy Holiday Season, everyone!  I hope you're feeling better than I am today (I'm suffering from my annual "the-semester-ended-so-I'm-immediately-sick" cold.)  But this is giving me some much-needed time to do a little bit of catching up, and Ollie is certainly an adorable sick buddy.  Happy Monday, and thanks for stopping by!

Friday, October 26, 2012

Tablecloth curtains

In keeping with my last couple of projects, I finally finished the curtains that I started a few weeks ago.  I had gotten rather used to them sitting in a semi-folded pile on top of Oliver's crate, but I do think they look better hanging!  They were just so simple, and I'm glad I finished them before the weather really turned to winter here in Cleveland.  Curtains just make everything seem a bit cozier, don't they?


I made them out of some white cotton lining fabric I'd been holding onto for a couple of months, and a teal tablecloth that I found in the clearance section of TJMaxx.  I'm not quite sure what the the tablecloth is made of (it was shelved sans packaging or tags) but I just loved the embroidered detailing...and for around fifteen bucks, it was quite a steal!  Since it was a large rectangular shape, I simply cut it into four pieces (two panels per window) and hemmed the unfinished edges.  To make up the difference in length (since the tablecloth wasn't quite long enough to cover the window) I cut four rectangles of the lining fabric that were about the length of the windows, but with some width to spare (as you can probably tell, I'm not exactly nit-picky with measurements.)  I hemmed the edges, and folded the top edge over two inches to make a casing for the curtain rod.  I picked up some double curtain rods, and that was it!

I just can't get enough blue these days, so I'm loving the added color in my bedroom.  I'm slowly but surely working through my list of home projects...so on to the next!  Happy Friday!

Friday, June 22, 2012

Party time shoulder bag

Hello hello hello!  Last week when I was at the sewing store, I picked up a few yards of yellow trim...it was inexpensive, I love mini pom-poms, and I have an addiction to buying trim.  I didn't know exactly what I would use it for, but it was too cute to pass up (which is always a valid argument.)  So the other day I used it to liven up a little cotton shoulder bag, and now this satchel is ready to party!


In order to hide the cording on the back of the pom-poms, I pieced the bag together in strips (sandwiching the trim between them) rather than sewing the trim to the front of one big piece.  I was worried about having the trim poke out unevenly, but the cording was wide enough that this step was a piece of cake!  And now the cording is neatly tucked on the inside, and all you can see are those cute little pom-poms.  

For the inside lining and pockets, I used some pink and yellow cotton pieces that I had in my fabric pile.  Pink and yellow look so warm and cheery together, don't you think?


I added a magnetic snap at the top, which I camouflaged with two covered buttons, matching the pink lining.  For the strap, I cut one long strip, double-folded the ends towards the center, and reinforced it with a strip of floral ribbon.  It's sturdy, thick enough not to wrinkle up when I'm wearing it (or dig into my shoulder) and cute to boot!  (I just knew I'd find a purpose for that floral ribbon when I bought it back in January...)


Since I skipped any complicated closures and just sewed the strap right into the top of the bag, this was a  pretty no-fuss project.  And by using (almost entirely) leftover supplies, it was an (almost) free new summery bag!  It's lightweight, a practical size, and just festive enough for a Florida summer.  I can't wait to take it out...this bag is ready for some fun!

Thursday, June 21, 2012

Bike bag strap: take two

Hi, y'all!  I spent some time yesterday making a new strap for the bicycle bag I made a couple of weeks back.  I had originally tried a braided strap, which gave me a few too many complications.  So I took that off, and went with a wider white strap, double-folded towards the center, and reinforced with some grey bias tape.  I love it, and it's way more functional!  Here's the new-and-improved bicycle bag:


Happy Thursday, and thanks for stopping by!