

Hello friends, and welcome to my first tutorial! Please let me know if you have any questions or problems with the tutorial, and please do share your completed projects with me...Id' love to see! So without further ado, I give you the official Polka-Dotted Pearl Dog Bow-Tie Tutorial!
To complete this project you will need:
Cotton fabric (totaling less than 1/8 yd.) (This is a great project for scraps!)
3/4" wide Velcro (the kind I used was pre-cut into 3/4" squares)
Thread
Sewing machine
Hand sewing needle
1. Cut four rectangles out of your fabric: two that are 4" by 5", and two that are 4" by 2". They should look something like this:

2. First, we'll make the main bow piece. With right sides together, sew the two larger rectangles together, leaving an opening for turning. I left my opening at the center of one of the longer sides, so that it can be covered up by the band in the center of the bow. (You can see where my opening is in the picture below.)

3. Clip your corners, turn your rectangle right side out, and press flat. Close up the gap.
4. Now that our rectangle has nice neat edges and is all closed up, it's time to fold it up into a bow! Start by folding the piece in half lengthwise (like a hot dog.) Next, create two parallel folds, one on either side of the original fold.
Fold one:

Fold two:

Fold three:

5. Tack the folds in place by adding a few hand stitches in the center. Don't fret if these stitches are visible, because we will be adding a band around the center of our bow and those stitches will be covered right up!

6. Set aside your main bow piece, and pick up your two smaller rectangles. Press one short end to the wrong side, about 1/4". Do this on one short end of each rectangle.

7. Then press each piece in half, lengthwise, with right sides together (like a hot dog.)

8. Sew one short side and one long side of each piece, making sure to leave the folded short end (from step 6) and the creased longer side open for turning. Repeat on the second piece.

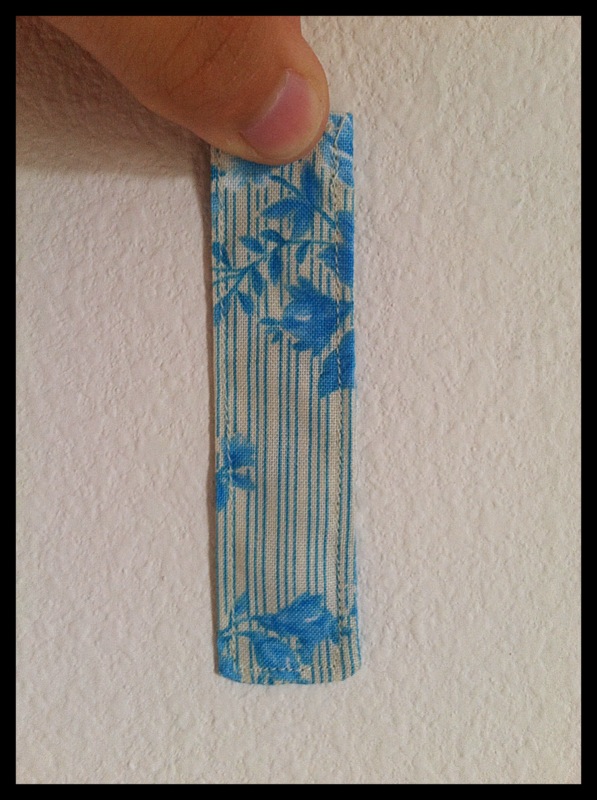
9. Turn your pieces right side out and press, making sure to poke out your corners. Top-stitch around all four sides. You should now have two strips that look something like this:
10. Take one of your strips and wrap it around the center of your main bow piece. Make sure the end-point is at the back of your bow, so that it can be covered by the second strip. Once you have it wrapped, tack the end in place by hand. Here is what the back of your bow should look like:

11. Take your second strip, and lay it vertically on the back of the band you just tacked in place, covering those stitches from the previous step.

12. Stitch the sides where the two bands meet by hand, so that the second strip is attached to the first strip. (In the center of each long side.)

13. You're almost done! Now that the back strip is attached, it is time to attach the Velcro. Start by making a loop with the two loose ends of the back strip.

14. If your Velcro is pre-cut into squares, grab two squares now (one male and one female.) If you are using longer strips, cut them into squares now (3/4" by 3/4".) Stick your Velcro squares together, and then slip them in between the ends you had pinched into a loop in step 13.

15. If your Velcro is adhesive, un-stick the Velcro pieces from each other, but leave them stuck to the fabric. If your Velcro is non-adhesive, un-stick the pieces from each other and pin them in place on the ends of your fabric strip. Stitch your Velcro pieces in place (I recommend doing this even if you're using adhesive pieces...it never hurts!) Your pieces should look something like this:
Back:

Front:

And that's it! Now that we have that little Velcro loop on the back, the bow attaches easily to any dog collar. So, stick it on your favorite little pal and enjoy!


love this!!! So cute! Thank you for the tutorial!!
ReplyDeleteYou are so welcome, I'm so glad you enjoyed it! Thanks for stopping by :)
DeleteCould you hand stitch everything instead? I don't own a sewing machine :(
ReplyDeleteYou could certainly hand stitch if you don't have a machine! I'd recommend doing a good bit of ironing, so that everything stays where it should as you stitch everything up. You could also try something like "wonder-under"...it's a bit like sheets of glue that you can stick between your pieces of fabric. Then you iron over it, and your fabric pieces stick together. You could also do all of the hand-stitching with a thicker thread (like embroidery floss) and use a decorative stitch. Hope this helps...Happy (hand) sewing!
Delete